Thursday, November 20, 2014

Clam Lynch- my favorite painter, and so much more


I met Clam Lynch at the downtown Farmer’s Market this summer when he was hawking his wares, and I was just blown away by his work.  Never before have I been so moved by a set of paintings.  And yes, I realized that’s a big claim, but it is completely true.  I’m enchanted by his bold, energetic style; it is bright and exciting and often really funny.  I haven’t yet decided on which painting to buy first, but its just a matter of time.  Anyway, I like his art so much that I wanted to take a little time to get to know him and try to introduce him to as many other folks as possible.  That’s the name of the game here with this silly little blog of mine- to celebrate the handmade and homegrown any way that I can.


Clam turned out to be quite a character with a really captivating history.  At 15, he left home and joined a performance art group that took him around the world.  At a show in New York City, a fellow from the fledgling Nickelodeon network saw him and brought him to LA.  This served as a springboard to a 12 year career as a Production Designer for film and tv.  He also did his fair share of performing- his one-man comedy show entitled “Cut the Crap” (about a dysfunctional motivational speaker) caught the attention of Rosanne Barr (yes, the Rosanne Barr).  He even went so far as to partner with her production company to develop a tv pilot.  Whew!  He’s also a children’s book author- Ruby Gloom’s Keys to Happiness hit the shelves in 2004.

But, let’s revisit his painting- for the time being, at least.  In San Francisco, he established and operated the 63 Bluxome Street Art Gallery, where he displayed and sold his paintings.  It seems like it was a sweet setup, but ultimately he relocated to Salt Lake on account of some important family ties.  That was 1 1/2 years ago.  He’s been creating art the whole time, and that is how he makes his living, but- wait for it- he has a really big vision for something even greater. 

Clam uses reclaimed materials of all kinds for his paintings and other artworks, and it is exactly the kind of waste-not-want-not value that most of us can easily get behind.  An inveterate scavenger, he has personally kept literally tons of old barnboards and the like out of the landfill.  Now let’s add in the fact that he has taught art classes to kids on and off for more than a dozen years, and voila, you have the essence of the organization that he calls Art Salvage.  He envisions a space full of great recycled materials that artists can purchase for pennies on the dollar, and where kids from the age of 6+ can come to get creative. 

The most robust iteration of his plan includes an attached gallery space so that kids and other artists can display and sell the work they make in-house.  Pretty great, right?  What’s more, this isn’t just a pipe dream- the project has momentum and he’s working side-by-side with a prestigious arts group in Salt Lake to finish up attaining non-profit status for the venture.  His next goal is lining up a space- so if anybody has any thoughts, holler.  I’ve spent plenty of time listening to people spin yarns that you can just tell aren’t going to materialize- heck, sometimes I’ve been the one doing the talking- but this wasn’t one of those bull sessions.  I fully expect to see Art Salvage materialize and do a lot of good for a lot of people in the Salt Lake valley.


So right now, Clam is one busy guy- he’s painting up a storm, and he’s spearheading what will certainly be one of the most exciting arts initiatives in the region that I can imagine.  I encourage any interested parties to visit Clam’s Facebook page for up-to-date info on his paintings and other works of art.  https://www.facebook.com/ClamLynch

He’s also got a fun website at www.clamlynch.com which showcases a lot of his older performance-related stuff.  If you’re interested in communicating with him about Art Salvage, his paintings, or anything else, find him on Facebook or at clam.lynch@gmail.com

Just for the fun of it, I'll add a couple of more pics below- and in case you're interested, his prices are very reasonable.  And that's coming from a confirmed tightwad.  I've seen pieces that I'd LOVE to own for under $200.  If you want to make my year, you can do it for under $400.  I just built a new fireplace mantle for our home that needs something great to go above it.  Hmmm... 


Monday, October 20, 2014

Yeah, I'm a Cheesy Guy: Where there's a Will there's a Whey


Do I love cheese?  Oh god yes.  I've actually engaged in earnest debates about just how much of one's net worth one might reasonably have tied up in cheese.  Now, I was a lot younger at the time, and my net worth was only in the double digits, but still...

Another great memory:  my wife Michele once went to Spain for work and asked what kind of souvenir I wanted.  I said "cheese," and she came home with an entire wheel of Manchego.  Just thinking back on it makes me want to renew my vows.

A few years later I saw Celia Bell make cheese at home and I was enchanted. Celia's a real inspiration in the Salt Lake grow-your-own-food scene, and  the fact that she had just milked a goat beforehand  to get the milk really sealed the deal.  JEALOUS!


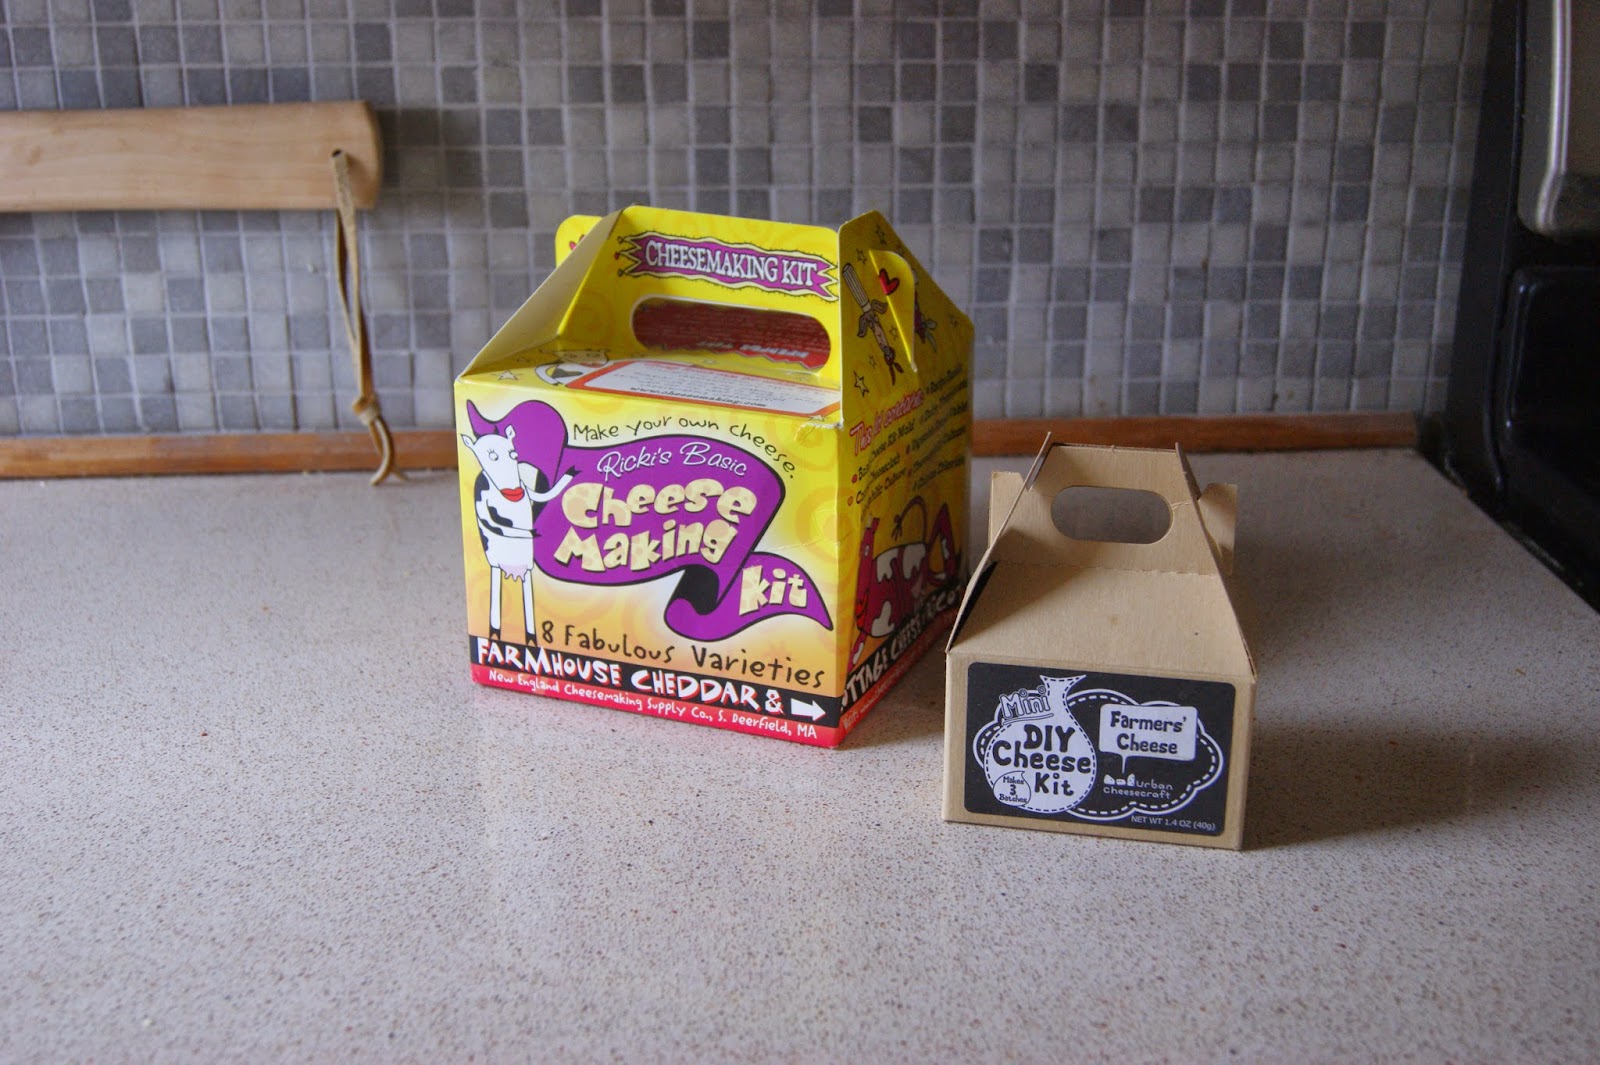
It wasn't long before I had gotten a couple of inexpensive DIY cheese-making kits.  One came from my mother-in-law: nice job, Jan!  The other I purchased in Salt Lake City at the Urban Farm and Feed Store

I decided to try out on of the kits, and it was super easy to use.  It also made a delicious cheese.  Fresh mozzarella with basil, in  this case.


The kit contained everything we needed,
including good directions (whew!)
The only thing we needed was a gallon
 of whole milk.


Abigail and I got after it and it found that it was an ideal project for kids to attempt with their grown-ups: there's a few different things to add, and lots of mindless stirring.


Fresh basil?  Yes please.  It was sort of an
off-the-cuff experiment, but I was actually
surprised by huge difference that it made.  I have since made it without fresh herbs and wasn't
as enthused: I'll always jazz it up from now on.


The moment when the liquid-y milk mixture separates into curds and whey is kind of neat.
All of a sudden, you have something that almost resembles cheese.


After pouring off most of the liquid, we put the
solids into a basket lined with cheesecloth so that it could continue to drain.


The cheesecloth is invaluable in helping to form the fresh mozzarella in to a ball, and to make it easier to squeeze out the remaining moisture.


One gallon of milk made a couple of good-sized
hunks of fresh mozzarella- I didn't weigh them, but it seemed like a great value to me.  And because the kits were so reasonably priced $12-20- and because they contain enough ingredients to make numerous batches, they do make good financial sense.  Not that I was too worried about it, since cheese appropriations make up such a large part of my financial portfolio, anyway.


Wednesday, March 26, 2014

Waltworks Custom Bicycles- sweet frames handmade in Utah


Salt Lake has a pretty great biking culture- we’ve got sweet trails for mountain biking, lots of bike lanes for commuting, and pretty robust cyclocross and road racing scenes.  It is no surprise, then, that we’ve also got some nifty bike-related businesses.  Most of us have a favorite local bike shop, for example, and the Bike Collective offers a ton of great programs that are worth checking out.  And, since I have a deep affinity for all things handmade, I am especially psyched about Walt Wehner’s framebuilding shop.  He’s  been at it for about a decade, and he's got a big following, especially among hard-core mountain bikers.  The funny thing is that not many locals know about him at all.  If you dig bikes, keep reading, and you'll see why he's one of SLC's best kept secrets- and why he probably won't stay that way for long. 

Prior to moving to Salt Lake City two years ago- his wife Sarah took a job doing research at the U, which is coincidentally how I ended up out here, myself- Walt lived in Boulder, Colorado.  His first bike was a 29er, which he crafted back in 2003 or 2004, because he saw great potential in the style.  This was before 29” wheels had exploded into their current level of popularity.  The timing was fortuitous, because only two major companies offered frames for 29ers, and Boulder’s enthusiastic mountain biking community starting asking Walt to build frames.  While he's quick to point out that his early efforts weren't as well-crafted as his later bikes, I bet they were still pretty good- Walt's obviously a pretty modest guy who I'm guessing is his own worst critic.  Over the years, his clients have pushed the limits, and he’s built road bikes with disc brakes, framesets and forks for wheels with through-axles, and more. 

One of Walt’s major areas of expertise is in designing a bike to fit well and handle the way its future rider envisions.   He's got a whole bagful of tricks that he can apply to a bike's geometry, and this helps him to focus first and foremost on performance.  He works with a powder-coating company in Salt Lake City that can provide all kinds of colors and finishes, but he doesn't generally go in for heavily adorned bikes at the expense of poor fit or function.  He told me a story about some of his customers from the endurance-racing side of the mountain biking community: when asked about their choice of color, they flat-out told Walt that they didn't care.  I think that's a pretty apt summary of how well Walt is able to deliver on his promise of performance and handling.   

Walt’s focus on bike fit means that the process of designing a frame calls for a lot of back-and-forth with his clients.  They describe their goals and riding style, and they work together to develop a plan for how to make it happen.  To this end, Walt spends a lot of time on the phone with his clients, and he also maintains a really interesting blog at http://waltworks.blogspot.com/ where he posts work-in-progress shots of his frames so that his clients can see how things are shaping up.  

 Walt has built between 500-600 bikes, which blew me away.  He said it comes down to about 50 per year for his clients, and then as many as 10 more for himself and his family members.  A recent project that I’ve seen him riding around the neighborhood on is a cargo bike with a large cargo platform on the front.  He designed it to be versatile, and it can comfortably fit people from 5’6” to 6’5” without requiring custom geometry.  It sells for $3000-$3500, and I have the feeling that it could get pretty popular.  But then, all of his bikes do- he’s never advertised, and all of his work comes from repeat clients and referrals.  And anybody who knows business can tell you that means he must be doing something right.


Monday, March 10, 2014

Making Sawdust- a quick look at my current projects


Right now, I'm finishing up a custom kitchen for David & Leah, who have undertaken a very ambitious restoration of a great old Victorian house in Salt Lake's Capitol Hill neighborhood.  Or maybe it's the Marmalade District; I've never been clear on where one starts and the other stops.  Either way, its a great 'hood, and it is under 10 minutes away, so that's a real plus.

In addition to the kitchen cabinets, I made the countertops, using reclaimed oak barn boards, the funky blue hutch, and I'm building a large built-in banquette for seating.  I'm also building some cabinets upstairs.  I'll post more later when I have more pics- when the dust settles, I'll get out my good camera instead of just using my phone for some work-in-progress shots.


In addition to the kitchen cabinets, I made the countertops, using reclaimed oak barn boards, the funky blue hutch, and I'm building a large built-in banquette for seating.  I'm also building some cabinets upstairs.  I'll post more later when I have more pics- when the dust settles, I'll get out my good camera instead of just using my phone for some work-in-progress shots.

Anyway, just thought I'd share what's currently keeping me covered in sawdust!


Sunday, March 9, 2014

Tree Branch Wooden Spoons

Got any tree branches lying around your yard?  Sure you do.  If not, its probably just a matter of time.  There's all sorts of stuff you can do with them, depending on your inclination, but one of my favorite projects is using them to make wooden spoons.  I've been pretty obsessed with spoon-making for the past couple of years, so I'm use this post to point out the tricks of the trade.  Using very basic tools that most folks have access to, you can probably make your first spoon in a hour or less.


This year, I decided to institute a new holiday tradition: starting in 2014, I plan to make a wooden spoon (or several) from the trunk of our Christmas tree each January.  I’m all kinds of excited about this, but, of course, you can just use whatever you have on hand, up to and including actual milled boards.  In this case I used a handsaw to cut the trunk into few 12” segments.


 Each spoon will be coaxed out of a blank that roughly resembles a board.  How you make this blank depends on the tools you have on hand.  A bandsaw is ideal, but an axe and chainsaw work too.  

Once you have a blank roughed out, draw the outline of your spoon.  I always draw an oval where I’ll be removing material for the bowl of the spoon, too.
      To cut out the spoon, use a jig saw, bandsaw, or hand-held coping saw with an aggressive blade. 


 I like spoons that look good in profile, too.  I usually go for something curvy and fun.

With the excess cut away from beneath the spoon, it is really starting to shape up.

To hollow out the bowl as quickly and easily as possible I use a large Forstner bit to remove a lot of the material.
To shape the interior of the bowl, I use a nifty little saw that mounts in any drill or Dremel tool.  With a little practice, you’ll quickly get a feel for how to use it.  I suggest starting out slowly if you haven’t used one before.
Because I’m pretty experienced, I can rough out a bowl in just a few minutes.  Even if it takes you twice as long, that’s still pretty fast!
From here on out, the work consists of smoothing things out.  To smooth the interior of the spoon bowl, use sand paper, or follow my lead and use a sanding drum in a drill.  Just make sure to let the sandpaper sleeve hang over the edge of the drum so that it mashes down and creates a rounded edge.
 A belt sander helps if you have one.

And so does a palm sander.


Sunday, December 22, 2013

Stock your bar with homemade bitters

In case you're not familiar, bitters are a common cocktail ingredient with an intriguing history and an even more compelling present. Originally developed as medicinal tonics, bitters are now sought after for the flavors- both subtle and bold- that they bring to all manner of delicious drinks.  Some baked goods even call for bitters as a flavoring agent.  The basic formula consists of a variety of herbs, spices, fruits, and more that are steeped in a base liquor. And there is really no limit to what you can mix up: I made four different types of bitters in less than an hour, and I'm pretty confident that I'll find a use for each one. It might take some experimentation, but hey, that's half the fun.


In terms of the process, you can use Everclear as a base, and vodka is fine, too. Just find something that is both strong (high proof) and neutral, and pour it into a mason jar. At this point, you can get creative or you can stick to a recipe. I like to improvise, so I basically just combine things that sound like they'd go well together. If needed, I can always make adjustments later.
Some ingredients may need to be ground or cut up- remember, the finer they are, the more flavor they can release. Once the ingredients have been added, just put on the lid, and shake the jars daily to help mix things up. After a week, you can strain off the solids and bottle the bitters.  You can dilute the bitters with straight alcohol at this point if you'd like, or leave them as is.  If you have a bottle with a dropper, that adds a lot of convenience, since bitters are used sparingly most of the time.


Here are the four varieties that I made up this time around. The quantities of ingredients that I added were determined pretty indiscriminately, so I'm not presenting them as recipes; they're more to provide inspiration:

Rosemary and sage
Dried blueberry
Thai chili and mango
Coconut, crystallized ginger, and cumin

At first the vodka was totally clear, but it changed within a day.


In terms of actual recipes, here's one from about.com

2 cups grain alcohol
8 oz dried orange peel, minced
1 tsp cardamom
1 tsp coriander
1/2 tsp caraway or anise water
3/4 cup granulated sugar

The process is that same as the one I outlined above.

Whether you decide to wing it or dig around online for more precise recipes, you'll have fun making homemade bitters. And they make a fantastic gift- in less than an hour, you can have the equivalent of 12 bottles to give away or keep. You'll also save money- I spent less than $20 on a quantity of ingredients that made over $90 worth of bitters if I paid retail.of bitters began as medicinal tonics, although this application has pretty much fallen by the wayside. Nowadays, it is all about the flavor.

Monday, December 16, 2013

Throwing in the Towel- the Hand Towel, that is

This may be the world's shortest blog post, but why use a thousand words when six or seven will do the trick? Anyway, I was surfing around Etsy (again) and I came across some of the greatest hand-towels ever. I'm going to go ahead and fess up to having a real thing for cute, quirky hand towels, despite the fact that I don't actually own all that many. This year, I think I'll treat myself to a couple. I've been a good boy, Santa, right? Right? Uh, Santa? Are you there, Santa, its me, Christopher? Anyway, if you like hand-printed stuff, check this out. They're SO...STINKING...CUTE. Just click on the image for more info.


Saturday, December 7, 2013

Keeping it Local for the Holidays

Here's the reality check: I've got a five-year old daughter, so unless somebody around here starts crafting plastic My Little Ponies, complete with the little heart stamps on the ass, I'm definitely gonna have to buy a certain amount of plastic crap from China in the next couple of weeks.  And I accept that.  I accept it in the way that I accept that my car runs on gasoline and not good vibes and pixie dust.  However, having been self-employed for the better part of 20 years now, I know first-hand what a huge impact it makes when people make a conscious decision to redirect even a portion of their spending toward the talented folks in their own community.  I'm grateful to those who have supported me and my work over the years, and that prompts me to get all circle of life-y and do what I can to support and promote some of the people in our town who make awesome stuff.  In the end, that is the real function of this blog: to celebrate the handmade & homegrown, and because I want to live in a place with those kind of values, writing is one of the ways that I live those values.

To create a nice, orderly list, I used Etsy.  I used to have mixed feelings about Etsy, but its growing on me, especially the feature that allows you to search by area.  Convenient?  Yeah.  Wherever you live, you can buy local without getting out of your pj's.  As it is currently 7 degrees out in Salt Lake, this works for me.

Anyway, here's a quick run-down of some of the artists & artisans that I've got my eye on around here.  Just click on the image for more info.


Sunday, December 1, 2013

Holiday Craftiness

There is so much homemade and homegrown stuff to celebrate around the holidays that I just can't find enough time to take it all in.  If only there were two of me...  sigh.  Anyway, since I'm limited for time, I guess I'll just pick one of the things that I look forward to most: decorating our house.  We don't go in for lots of outdoor lights, but indoors we go hog-wild with paper, scissors,tape, and paint.  Since I have a 5 year-old daughter, and she is always game for just about any kind of project (that's my girl!), we now have a ton of homemade decorations of all kinds.  For example, I'd guess that 90% of the ornaments on our tree each year are ones that we've made, starting since she was old enough to hold a paintbrush.  And, they're all really, really modest, but that's part of the charm.  You can always buy "fancy" if you spend enough, but of course its way more fun to go for colorful and creative and spend nothing at all!


Abigail helps make so many ornaments every year that we could
easily outgrow one tree.  But there's worse problems, right?
Grandma Skopec gets in on the action.
Every year we make a gingerbread house.  The trick is to keep the dog from eating it afterward.

What kind of stuff do you make for the holidays?  Gifts?  Food?  Decor?  I'd love to hear about it!  Feel free to leave comments, or hit me up on Facebook with your input.  How about holiday craft fairs?  Ever buy anything nifty at one?  Ever sell anything nifty at one?  My next post will be all about Craft Sabbath, the regular Craft fairs at Salt Lake's Downtown Library, so stay tuned.


Friday, November 29, 2013

Cider-Making Part II

Pressing Your Own

If you’d like to step things up a notch and make cider in larger quantities using your own apples, you’ll need two things: a way to chop up the apples into smaller pieces, and a press to put the apples into to squeeze out every last bit of juice.  Because the equipment can be costly to purchase, many people just rent them as needed.  Local homebrew supply shops are a great place to check.  At around $30-$50 per day, the cost quickly becomes manageable if you’re making a lot of cider and/or getting a few people to chip in.  In the latter case, you’ve got the makings for a cider party!  My friend Tara Shupe photographed some cider-making festivities at our friend Lyle Nay’s house, and she graciously allowed me to use the pictures here.

1) The apples are loaded into a grinder which reduces them in size so that they can be fed into the press.  

2) The chopped-up fruit is loaded into pressing bags. Originally made from cheesecloth, the bags are now commonly made from a more durable polyester blend.
  
3) Cranking the ratcheting handle exerts downward pressure and  squeezes out the cider.
4) Liquid gold!

5) Each carboys holds 5 gallons.  The yellow one is cider, and the darker one is a wild berry/apple mix.


Building a Down-and-Dirty Cider Press 

While I have no problem with renting a cider press, and I'm glad they're available at reasonable rates around here, I couldn't resists a little bit of tinkering to see if I could quickly throw together a functional press with a minimum of effort or expense.  The result was the $18 Cider Press.  I used one 2x4, and a bottling bucket.  At $16, the bucket accounted for most of the cost, but I already had it laying around anyway.  I also used the jack from my car.  The resulting press wasn't fancy, but it took less than half an hour to build, and just about anyone could do it.  The only power tools required are a drill and a jigsaw.


           1) I cut the 2x4's and screwed them together with 4" screws.  The frame measured 25"x19". 


                           2) I attached the frame to a pair of runners which will serve as the base.


                     3) I added two more 2x4's to create a platform large enough to hold the bucket.


4) Because the drain is located a couple of inches up the wall of the bucket, I needed to build up the floor  
                                            accordingly.  I began with a pair of 2x4 spacers. 


      5) To make a new bottom for the bucket, I cut a 10 1/4" diameter disc from some scrap plywood.


                          6) The edge of the disc needed to be notched to accommodate the drain.


7) I used a juicer to turn the apples into pulp.  You could also use a food mill, food processor, or blender.  I didn't have a pressing bag on hand, so I placed the pulp into a cheescloth-like fabric that I had on hand.


8) After gathering the ends of the cloth into a "bag" of sorts, I placed the dripping cloth into the press.  I 
                                                then set a second plywood disc on top of it. 


9) I used an 8" length of 4x4 lumber as a spacer: I just needed a way to wedge the jack in between the 
                                      top rail of the frame and the disc, and this worked fine.


10) Ah ha!